Butterfly Card
by Aparna Jain
(Pune, India)


Butterfly card
I have used a lot of layering in this card and I have used a color scheme of Violet and Yellow.
On a White card stock Paste the violet paper 1/4 inch smaller in dimensions of your white card stock.
Add a yellow gingham paper vertically - 1/2 the width of the white card stock.
Then on thin yellow paper paste a violet paper so that only a thin border of yellow is visible.
Add the white strip of paper on which you can either print your sentiment or like me, write it down.
I have added this beautiful butterfly that I bought from a store, to match up to the color scheme.
Hope you like it !
Christina says ...
The colour scheme is lovely and the butterfly is the crowning touch to this very pretty card.
It is always good to send a card to a friend ... and when it is one that has been handmade by yourself then it will surely be one that any friend would treasure... whatever the occasion.
Click here to read or post comments
Postal cards for my best friends
by Aparna Jain
(Pune, India)

Card 1


|


|


|


|
Hi Christina,
I a big fan of your work! and a regular visitor on the website.. First of all I want to THANK YOU for all the ideas that you share with us!!
I wanted to share this story of making cards for my best friends who are far off in different cities now.
Both of them have their b'day in the same month. So, I thought of making cards for them and visited your website.
The idea of a postal card was perfect for me and I made them. Attached are the pictures of the cards I made... Both of my friends loved their cards !!!
Thank you so much for the ideas!!
Christina says ...
These Birthday cards are lovely and I am not surprised that your friends are delighted with them. The colours are so vibrant and they really stand out.
The addition of the photos of all of you make it really special to each person and is something that will be treasured.
Now that the cost of posting is rising it is not always the best practise to add in the box... so this is why I added the Cards for Posting which is in the Video Tutorials in the NavBar to your left.
It shows you how to get a flat look but still keep the style that you have developed and I am so glad that you found it useful.
So thank you for adding your cards to the Gallery and welcome to you all the way from India
Click here to read or post comments
The Tale of Card Making
by Aparna Jain
(Pune, India)


The Green Gingham Card
First I want to thank Cristina, for sharing such wonderful card making ideas with us! Thank you so much!
Its been a few months now that I have been hooked to this hobby.. this card I made for one of my friend.
1)I have used a dark green backing paper and a green checks paper from the Gingham collection. I have cut a white paper with my curvy scissors.
2)I have made the flowers using a flower making kit available here in India(lots of paper flower-making tutorials available on the internet).
3)Then, Printed the sentiment and added it with popup tape.
4)To finish the card I added some silver sparkle to the edges of gingham, a silver ribbon and 3 cute little silver stones!
I hope you like it!
Christina says ...
This is the first time I have ever seen one of the papers that I designed used on a card so thank you for using it and sharing the photo with us all.
This one is from the Gingham Collection and if you wanted some they are in the "Freebies" section in the NavBar to your left.
The card itself is lovely and I really like the flowers that you have added from a kit.
I hoep you will use more of the papers and show us again what you come up with.
Click here to read or post comments
Birthday card for Brother and Best Friend
by Aparna Jain
(Pune, India)

Brother Card


|


|
I made these two cards with the same color scheme but for different genders.
First one for my Brother-
I have used a dark green card stock as the base for a manly look and added a black and white pattern paper from my stack.
The vertical golden strip of paper is taken out from an old wedding invitation. The sea green ribbon is pleated and a thin silver wire is added to give it a nice finishing look.
I have printed the sentiments and added with the popup tape.
For the Happy Birthday Sentiment - I have taken a small dark green card stock then pasted a white on it. Added the same sea green ribbon and over it added the sentiment using the popup tape.
Put them all together and walllaaahhhh... Birthday card for my Brother is ready!!
Second One for Best Friend-
For more feminine look I took a light green card stock and then again the layering technique. First plain white, then pieces of the designer papers. Ribbon is attached in the center. I have printed the sentiment, pasted it to a scalloped circle (for more girly look) and pasted this to a bigger while circle.
All together a feminine card from almost the same colour scheme!!!
Christina says ...
Very clever idea and the colour scheme is one that is suitable for either and also for any occasion.
The ribbon effect on the first card for your borther is lovely and I hope he appreciates what a talented sister he has.
Click here to read or post comments
Paper Flower Cards
by Aparna Jain
(Pune, India)

Thank you card


|


|


|
I made these two cards recently when I was learning how to make different types of paper flowers from the internet.
These flowers are really cool and I have used the layering technique explained on this site by Christina in some of her cards.
The first card is a Thank you card that I have made for my Doctor. I have to give it to him yet. I hope he likes it and this card conveys my gratitude towards him and his work.
The second card I have made for a friend of mine.
Both the cards have flowers made with circles and very simple.
Christina says ...
Adding flowers to cards is such a wonderful way to add some luxury and if you do as Aparna has done here then you will never be short of some that will match your project.
It is a good way to use up all those scraps that are just to pretty to throw away .. and I know we all have lots of them in a scrap box.
Make them work and try some of these flowers fro yourself... and you will find lots of tutorials and lots of different ways to make them in the NavBar to your left
Click here to read or post comments
Happy Day/Best Wishes Cards
by Aparna Jain
(Pune, India)

Collage of a few cards

")


|


|
")

|
Hi Cristina,
I made these cards on a festival called "Diwali" in India which it as big a Holiday time as is Christmas in western countries...
I wanted to give my "best wishes" to my colleagues in office for this festive season, so made approx 25-30 cards for all of them.
These are Hinged cards, in which I have used various flower arrangement techniques which you have shared in one of your videos.
Some of these flowers are handmade and some I bought from a near by craft store. On some I have used doilies and ribbons and stones/sequences for decoration.
All my colleagues and bosses loved them! I hope you like them too. I want to thank you for sharing such wonderful ideas with us always!!!!
Christina says ...
Oh my what beautiful cards ... so bright and cheerful. I love all of them they look gorgeous and I am sure the photo does not do them justice.
You have been really busy making all these and I hope your day was a great success.
Thank you for sending them in and I know others are going to love them too.
Click here to read or post comments
Birthday cards with handmade flowers and boxes
by Aparna Jain
(Pune, India)

Pale yellow and green color scheme


|


|
I have made this card with a yellow and green color scheme. It is 5.5 inches by 7 inches. The flowers on the card are handmade by me using the quilling paper strips available.
The ribbon like effect is also given by the quilling strips and on the narrow one I have made a punch using a border punch (because I did not have matching color fabric ribbons)
Finally I have used gems to finish the card.
I have also decorated the inside following the same theme. However I have put a gem flowers inside instead of paper flowers.
I also made a box (after watching a tutorial from your website) with the window on top, which shows the handmade flowers! I am very happy with the result.
In the Second one I have followed a monochromatic color scheme with different shades of purple. Again the flowers are all handmade with quilling paper strips.
The bow is made with white satin ribbon, and followed the same theme inside.
Made a box with window for this one as well!
Thank so much for sharing and teaching us these wonderful ideas!
Christina says ...
Such bright and beautiful cards and I am sure any of your recipients will be thrilled to get one. I love the colors you use.
And creating a box makes them makes them even more special. A real "Keepsake" to be treasured for years to come.
Click here to read or post comments
Easel Card
by Aparna Jain
(Pune, India)
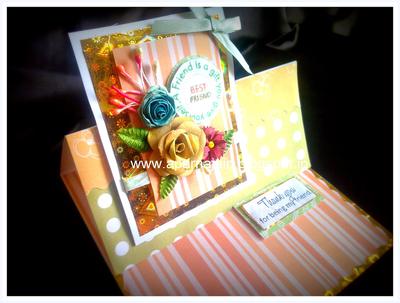

I have made this easel card with a square card measuring 5.5 by 5.5 inches. I have made it for no one particular in mind.....
The color combination that I have used are light orange, green and gold. I have made these flowers by watching Christinas' tutorial on how to make paper roses and the card after watching the video tutorial for making Easel Cards.
I just love the tutorials and the tips you keep giving between them! Thank you so much for sharing your knowledge with us!
Christina says ...
This is a very pretty card and you use some wonderful colors on your designs. So bright and vibrant.
I am so happy that you are finding the tutorials easy to use and that they help you to make some of your wonderful cards ... and thanks to you for sending them in to the Gallery pages
Click here to read or post comments
Paper Roses
by Aparna Jain
(Pune, India)


paper roses
Dear Christina,
I wanted to share the picture of all the paper roses that I made after watching your video on How to make paper roses!
I am from India and we do not get most of the supplies that you mention in your videos or if we do get they are very very expensive!
So I loved it when you had shown a way to make that template from which even I could make these roses (without the punch)!
And once you showed me the way I went ahead and made 3 sizes of this template by my own way as with the one you told the flowers were quite big! (at least for my cards)
So here is the picture of all the roses I made. The two big one are with the size of template you have shown and the rest are from the smaller one I made!
Thank you for the idea! I have used these flowers in a lot of my cards and they have been well appreciated!
Where there is will there is a way!
Cheers! :)
Christina says ...
This is a real display Aparna and they are gorgeous. Think of the fun you can have now adding them to your projects.
And so easy to make using the tutorial that can be found in the Video Tutorials in the NavBar to your left.
Look for Paper Roses and then when you have made some take them to the next level with the Enameled Rose Tutorial
More cards from video tutorial
by Aparna Jain
(Pune, India)

Thank you Flap Card


|


|


|


|
Here I am adding 3 of my cards that I have made.
The first two cards I made after watching the video on basic card folds. The flowers are also handmade from your tutorial on how to make paper roses.
The thank you card is card with a flap.
The Second birthday card is an off center gate fold card. Here I have added a paper bow as learnt from one of your tutorials.
The third one I made from your tutorial on making a diamond card with the same measurements that you have mentioned in the video.
I have decorated the diamond top with quilled flowers and two butterfly buttons that I had in my stash. The bottom part has a matching ribbon and some self adhesive bling on.
On the the inside I have put in a corner (made of paper dolly) to hold a tag and bow from the matching ribbon.
I made this diamond card the same day you had put one on your blog recently :)
I hope you like them!
Christina says ...
What a busy day you have had making all these cards and they are all just lovely.
I am glad that you found the tutorials easy to follow and what a compliment to me that you show what you have done.
The Diamond Top card looks beautiful but I really love the roses you have made ... they look real and very pretty.
They are so easy to make and with no special tools at all. If you would like to make these flowers as Aparna has for her cards then you will find the tutorial Paper Roses in the NavBar to your left
Click here to read or post comments
My First Shaker Card
by Aparna Jain
(Pune, India)

Easel Shaker Card


|


|
This is an Easel Shaker card that I have made specially for a friend of mine who turned 31 on 9th March 2014. He just loved the card and the box I made for it!
I made this shaker wine glass with a theme of red and gold because he loves red wine.
It goes well with the other colors on the card which are shades of brown and gold.
I have followed your tutorial on how to make a shaker card and Easel card for making this card!
Also the flowers that are added are what I made after watching your tutorial on the same. I have added a button with the flowers which has an anchor on it and added some red bling on to the car for balancing it!
The front sentiment says " On the circumference - You're not old.... you are chronologically gifted! and in center - with the picture of a wine glass and cheese it says - Aged to perfection! It was this sentiment that inspired me to make that shaker wine glass!
On the inside I have added a matching ribbon and lace which is there on the front as well but not visible in the picture...
The sentiment added is Happy Birthday with a bling flower from my stash.
I made a box for the same with a bow and sentiment that says "Handmade with love"
I am so happy with the result and so was my friend!
Thank you Christina for sharing all these wonderful ideas!
Christina says ...
What a really gifted card this is and I am not surprised that your friend loved it. It fits the bill perfectly for a red wine lover ... man after my own heart !!
Combining two different styles of cards extends your repertoire no end and is sure to be unique when you do.
That is always the beauty of a handmade card ... there will never be another one like it .. and that makes it truly special.
Click here to read or post comments


Recent Articles
-
Memory Book
Oct 15, 22 09:17 AM
 Make a memory book, fun to make and even lovelier to give.
 -
Die cut letters.
Jul 19, 21 10:12 AM
 Add that personal touch with die cut letters, add names or sentiment as you please.
 -
Diaper Fold Card.
Jul 19, 21 09:34 AM
Create this fun Diaper Fold Card...and no need for a pin!
Search
