Chase Your Dreams
by Nancy Pence
(Middletown, Ohio, USA)
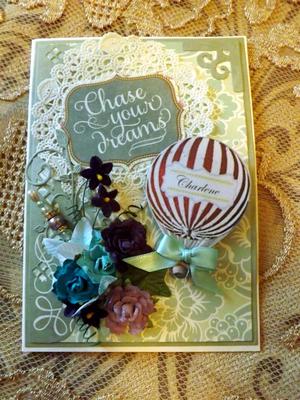
I have been making cards for 3-4 years, but this is the first card I've made following some of Christina's design ideas.
It's my very first attempt at a floral spray on a card. I do my best to 'personalize' my cards for the recipient.
In this case, my friend volunteers for our area's Annual Hot Air Balloon Festival, so that was the main focal point for the 5x7 design.
The hot air balloon used was from my own collection of vintage ephemera, triple layered for a 3-dimensional effect, and personalized with her name.
I also used the 'Mini Fanciful Flourish' die from Cheery Lynn Designs, incorporated a hand made 'Mini Hat Pin', and a 4" paper doily, as the finishing touches.
The first day that I laid out all of the card elements, I struggled with how they were all going to come together, so I walked away and left it for the next day.
The second day, I had the card completed within 30-45 minutes! My friend's Birthday isn't until June 25th, so I cannot share her reaction to the card with you at this time.
But I am truly excited to give it to her on her special day!
Christina says ...
Your friend is going to be overjoyed with the really special card that you have made and I am sure it will be a treasured "Keepsake" for years to come.
It is truly a very pretty and the colours all work well together. Everything just fits perfectly together and you must be proud of the work you have designed.
I love the flowers along the left of the card and once again you have blended the colours to work together really well.
But we need to know what your friends reaction is once you give her this beautiful card .... so please let us know xx
Click here to read or post comments
Daisy Heads Flower
by Nancy Pence
(Middletown, OH USA)
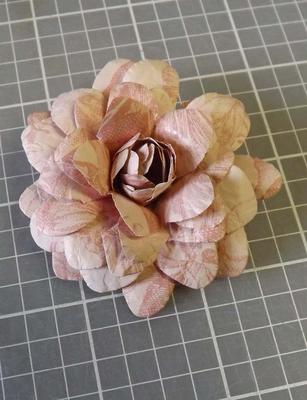
Christina, here is the first flower that I made after watching your video using the Spellbinders Daisy Heads Flower Die.
I used a pink on pink print paper, and two of each size flower in the set. Not too bad for the first try.
Thanks so much for your wonderful videos! Thanks to you I'm trying some new techniques!
Christina says ...
Very pretty and it will look fabulous on a card.
They turn out quite a good size and sometimes one is all you need.
But adding in the little buds can extend the effect just a little further and they are so easy to create.
Sprinkle them with glitter, or touch the edges of the petals with some Gilding Cream for a luxury look.
Click here to read or post comments
Ombre Card
by Nancy Pence
(Middletown, OH USA)
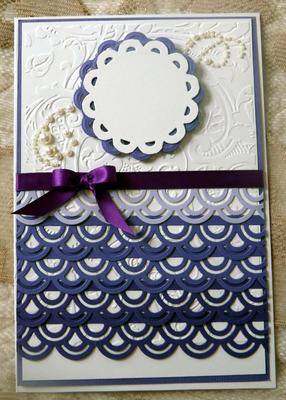
Christina, my Asian Accent dies arrived today, and I couldn't wait to get up to the attic to see what I could do with them . . . and, if I had learned anything from your "The Art Studio" class! Here is the result.
I made the "Ombre" card in a 5x8 classic portrait fold card and just used some paper that I had on hand.
But I did learn that there needs to be more definitive shading in the paper colors for a more 'true' Ombre effect.
I worked on the project for over an hour, embossing the white card, and added pearl 'Bling'
I have not yet attached the white medallion at the top because I'm not sure what the sentiment is going to be, or how the card will be used.
It may just end up with my samples as a 'learning tool', we'll see. I hope you like it!
Christina says ...
Oh! Nancy you are an admirable pupil and the cards is so beautiful. You have done both of us proud.
I thank you so much for joining my class in the spirit that you have and for showing us your own work.
If you would like to join the same class as Nancy then take a look at My Card Class" in the NavBar to your left.
It is a paid for class with "The Art Studio and a new class will be added bi monthly. The subject is the wonderful Spellbinders and how you can get the most out of your purchase.
Pink Lace Ribbon Card
by Nancy Pence
(Middletown, OH USA)
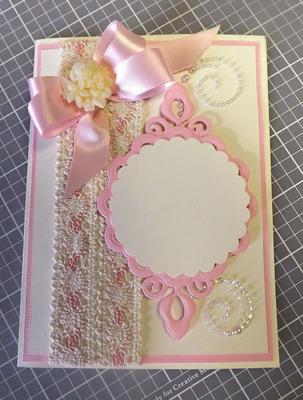
This card is loosely based on the first card that Christina made in her "The Art Studio Class".
I couldn't use the square shape from the Spellbinders Asian Accents set because it was too large for my card.
I did use the scalloped circle and a smaller accent piece that I cut in half and added to each end of the circle.
In lieu of the double scalloped border die, I chose this beautiful lace ribbon down the left side of the card in a double row.
Again, I learned something when it was too late to do anything about it. This card is screaming for an embossing folder to be used on the top white surface of the card.
The final white scalloped circle is not yet attached because I do not know what the sentiment will be or who will receive this card. Hope you like it, Christina.
Your struggling student . . .
Nancy
Christina says ...
This is so pretty and I love the softness of the pink lace. You must be proud of your achievements with these cards Nancy as they really do you credit.
And whoever gets one for whatever occasion is going to love it as much as I do.
The class is there to give you some ideas but what you do with them is the fun part. This is such a good example of how you can change things and use what you have in your own "Stash" to make it your own.
There is more information about the class in My Card Class in the NavBar to your left.
You will also find the link if you would like to join this paid for class and learn more about the Spellbinders that you may have in your collection.
Click here to read or post comments
Yellow Ombre Card
by Nancy Pence
(Middletown, OH USA)
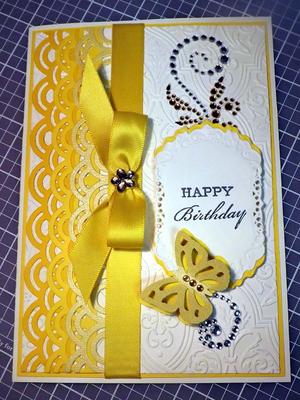
This is another version of your ombre card from 'The Art Studio' class last week.
The die used for the label is from the Spellbinders Floral Ovals Set. The embossing folder I used is one I've had for quite a while.
I think this would also make a great 'Get Well' card, the colors are so bright and cheery!
Christina says ...
This technique is so pretty and the effect is never disappointing. It is great to see you altering the basic idea to suit what you want and the card is a credit to you.
The yellow that you have chosen is lovely and would cheer anybody up if it was sent as a "Get Well" card.
The ribbon and bow look fabulous and really add that touch of luxury to the card.
And I love the use of the flourish to adorn the card ... a little goes a long way.
Click here to read or post comments
Les Papillions
by Nancy Pence
(Middletown, OH USA)
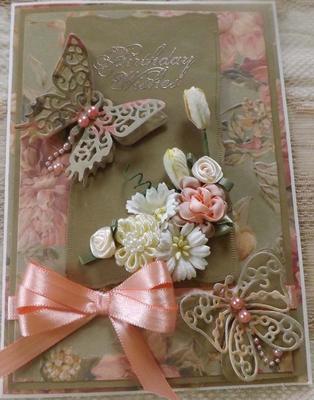
This 5x7" standard left side fold card is made from paper that I've had for some time.
The layers are cut from Spellbinders Matting Basics A & B. The center 'label' is cut from Radiant Rectangles, and butterflies are from Spellbinders Les Papillions die.
The floral paper came pre-embossed, and I think that the peach ribbon and triple bow really brighten the colors in the card.
I've embossed the Happy Birthday sentiment with 'Medieval Metals' embossing powder, but it's truly a little dark for this card.
The card is not yet intended for anyone special, so I'll just keep it until it's needed.
The flowers I added are from my 'stash', but I believe most of them came from Wild Orchid Crafts.
Christina says ...
How I would love to be on your mailing list Nancy as this card is so lovely. It would be perfect for any occasion and it is very pretty and feminine.
What woman would not love the flowers on it as I think they make the card so special... and you should be so pleased with the end result.
Click here to read or post comments
Soft Shades of Green
by Nancy Pence
(Middletown, OH USA)
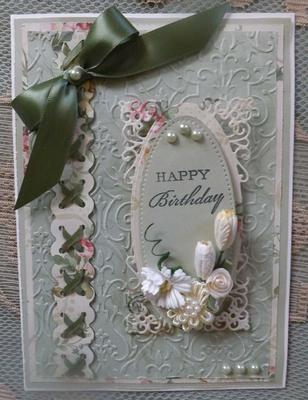
This 5x7" card is made with a traditional left side fold, and using Anna Griffin papers.
The embossing is done with her 'Foundry Embossing Folder', and the die is from Spellbinders S5-161 Radiant Rectangles.
The left border is a scallop punch cut on both edges of a strip of paper with 1/8" ribbon woven through. I saw Christina do a similar technique on a card a few weeks ago, but with a wider ribbon. The ribbon, flowers and pearls came from my 'stash'.
I've been making cards for a few years now, but this is the first time I've tried the 'woven ribbon' technique. I like the effect, and hope that you do as well.
Christina says ...
This is such a pretty and delicate card and I love the beautiful shade of green that has been used.
The technique that Nancy has used is on a Video Tutorial that you will find in the NavBar to your left.
Just look for Plaited Ribbon Card Tutorial and try it for yourself to get spectacular results just as Nancy has done on her card.
Click here to read or post comments
25th Anniversary Card
by Nancy Pence
(Middletown, Ohio, USA)
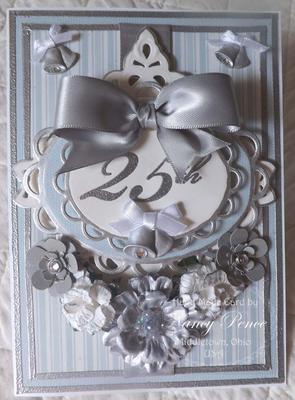
I just finished this pale blue and silver card for a dear friend of mine to give to her daughter when she celebrates her 25th Wedding Anniversary soon.
This left fold, 5x7 card engages two sizes of the Spellbinders Lacey Ovals dies, and the square die from the Asian Motifs set.
The layers were cut with the Matting Basics dies and edged in silver embossing powder. The labels were edged in silver pen.
I made the two smaller silver flowers, and I edged the two white flowers also with the silver pen.
The large center silver flower was purchased in a set. The design was then topped with silver wedding bells and a silver bow.
Christina says ...
This is a very pretty Wedding Anniversary card and I am sure it is one that is going to be treasured for a long time.
The Silver is so appropriate and adds such elegance to the end result. I love the Asian Motifs and they way you have layered them with other dies in your collection.
Mixing and matching your dies with other sets and even other brands can all make for a truly interesting card.
Click here to read or post comments
Hand-Died Lace
by Nancy Pence
(Middletown, OH, USA)
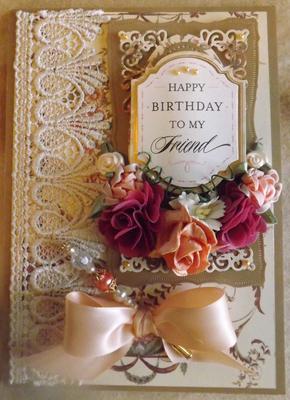
This card is made for a very dear friend. It's 5x7, left fold style leaves me plenty of room for embellishments like the hand tea-died lace.
I bought several yards of this lace a while back, and it is stark white, but white doesn't necessarily fit every card.
So, I cut the length I wanted and put it into a small glass of tea for a time, until it reached the shade that I wanted. (Careful not to leave it in too long, keep an eye on it!)
The labels are cut from Spellbinders Radiant Rectangles. The 'Happy Birthday' label, the pearls and paper I had in my stash. The ribbon was special ordered for this card . . . but while I was ordering, I got several other colors.
The flower spray with the 'hat pin' added the perfect final touch! I took the card with me to one of the local stores where I purchase supplied at times, and the owner told me that I should enter it into a competition!
I probably won't, but what she said made me feel good!
Christina says ...
This card is stunning and yes you should enter it into a competition. I think that your friend will have been delighted with it when you gave it to her.
I love the Lace and you have colored this beautifully ... just the right shade and it blends with that beautiful big chocolate box bow
Click here to read or post comments
Turquoise Fantasy
by Nancy Pence
(Middletown, Ohio, USA)
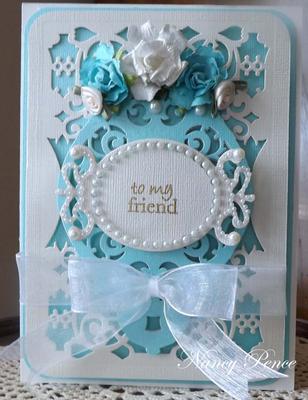
This left side fold, 5x7 card is made with a new die that I just received yesterday. It's Spellbinders S5-198 Tapestry.
It's one of those cards that looks much better in person because the turquoise layers and the top off-white layer both have a "pearlessence" to them, and the ribbon has a shimmer that does not photograph well.
I cut the larger white layer with the entire Tapestry die. The top turquoise layer is also cut with the full die, but then trimmed down to just the center motif then layered on to the white layer.
The white sentiment label is SB Fancy Tags Three, embossed in gold, with pearl bling from Want2Scrap. The flowers and white shimmer ribbon are from my stash.
Christina says ...
This card is simply beautiful and I love the colors that you have used. The die itself is on my "Wish List" ... along with many others.
Spellbinders are such a versatile invention and the cards they produce are the best. They never cease to amaze us with what we can create once we get those brain cells working.
If you are new to the concept of Spellbinders then take a look in the Sitemap to your left and you will find many tutorials to help you with them... from stating that collection and new ideas for you to try ... and then you too will make cards as lovely as Nancys'
Click here to read or post comments
Turquoise Fantasy 2
by Nancy Pence
(Middletown, Ohio, USA)
This is the revised version of a card posted yesterday. The left-fold, 5x7 card touts a new die that I just received a couple of days ago. It's Spellbinders Tapestry S5-198.
The base layer for the card is turquoise; the next layer is off-white and cut with the entire Tapestry die; the next layer is again cut with the die, but then I hand cut just the center motif and attached it to the white layer with foam pads.
The center label is heat embossed in gold, and is from Fancy Labels Three, with pearl bling from Want2Scrap.
This card is one of those that actually looks better in person . . . the turquoise and the off-white paper have a pearlessence to them, while the ribbon has a shimmer, neither of which photographs well.
Christina says ...
This card is just as pretty as the original Nancy and I love the color you have used.
Like lots of people you are far too hard on your own work as you have never added a wrong card yet ... everyone of them is lovely and you are so clever to create them xx
Click here to read or post comments
Halloween 2013
by Nancy Pence
(Middletown, Ohio USA)
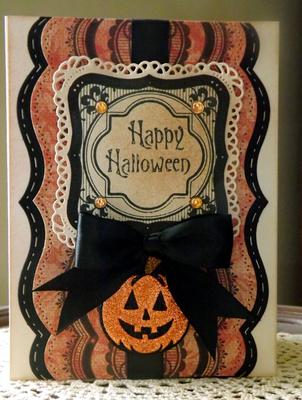
The basic design for this card is borrowed from Darcy Bruno, of JustRite Papercrafts. The colors in her original design just screamed 'Halloween' to me, so I have adapted the card accordingly.
I've made 15 of this 4-1/2 x 6" card, and just got them all ready for mailing and/or hand delivery yesterday.
I enjoy giving holiday cards early so that the recipient can use the card as part of their holiday decor, and enjoy it for the entire season.
Christina says ...
This card is wonderful for Halloween time and the colors are just perfect. This is a time that children love and they get dressed up and go Trick or Treating.
It seems to be more popular in the USA then here in the UK but I think we are catching up very quickly as each year goes by.
Springtime Lattice
by Nancy Pence
(Middletown, Ohio, USA)
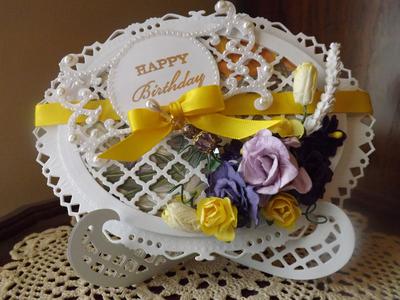
This is my first attempt at Christina's Oval Card on a Stand, and I've been wanting to try it for some time now.
Since a friend's birthday is Tuesday, I thought this was the perfect opportunity!
I used the exact dies and followed Christina's video instructions almost to the letter. The flowers, ribbon and gems are from my stash.
I'm pleased with the result and hope that my friend will be, as well. Thank you, Christina, for all of your easy to follow video instructions, and your endless inspiration!
Christina says ...
To see a card like this and to have someone say that they have followed my instructions to the letter makes me feel really pleased ... both with the card created and myself.
This is so pretty and I am happy that the video was easy to follow.
Your friend is going to be delighted with this card Nancy and will treasure it for ever.
I love the bright yellow ribbon that is around it and the flowers are beautiful.
Click here to read or post comments
Antique Pink Lace
by Nancy Pence
(Middletown, OH USA)
First of all, please allow me to give myself just a wee little pat on the back for being able to find the Gallery!!! For some reason it likes to elude my searches, but alas, this time anyway, success!!!
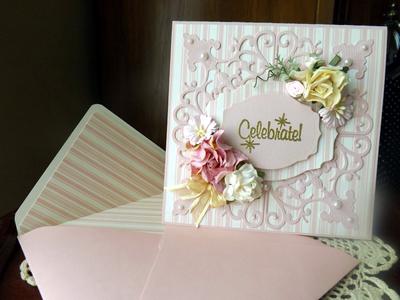
This sweet little pink card measures 5-1/5" square, hinged at the top. The 'lace' design consists of cutting 4 pieces from Spellbinders Shapabilities Die D-Lites Antique Corner (S2-072 and joining them together.
I have layered a subtle stripe over the initial base pink card for some contrast, then centered the lace over that.
The label is cut from the third and fourth largest dies from the Spellbinders Nestabilities Labels Thirty Six Set (S4-418). (The larger one from the striped paper and the smaller one from solid pink paper) The 'Celebrate' sentiment is embossed in gold. The flowers, pearls and ribbon for the little gold bow are from my stash.
The matching envelope for the card was made on the We Are Memory Keepers Envelope Punch Board and lined with the same pink striped paper.
The card isn't made for anyone special, so I'll just put it away and have it on hand when someone's birthday comes around.
I'm very please with the way this little beauty turned out. The original design, I believe, came from Just Rite Stampers web site, and I just thought it was so pretty, that I had to give it a try.
Christina says ...
This little beauty as you call it Nancy is a real treasure and so you should be pleased with it.
You have done yourself proud with this and who ever gets it will be delighted with it for what ever the occasion.
I love the pink and those flowers are lovely and look very much like Wild Orchid Crafts flowers to me ???
Click here to read or post comments
Peaches and Cream
by Nancy Pence
(Middletown, Ohio USA)
Christina, my sister-in-law, Sue, asked me to make a card for her to give to her cousin for her birthday next month. (I was so honored.)
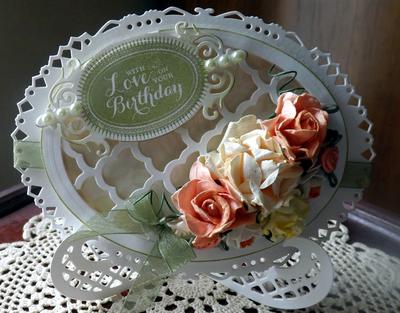
Her cousin had cancer last year and it has returned, so this needed to be a VERY special card. I decided on your Spellbinders Oval Card in the Joy Craft Die Cut Stand.
(For those of you who may not know, Christina has a tutorial for this card on her site that is so easy to follow, and the card turns out just perfect every time. The tutorial lists all of the dies. This is my second one, and they both now are in this Gallery.)
Anyway, after the card was finished, I knew I had made the right choice. I did the card in summer shades of peach and yellow, complimented with a pretty shade of green organza ribbon around and highlighted with a tiny bow at the bottom of the flower spray.
I added light green pearls from my stash to the tag just to dress it up a little, and also added a little green shading to the outside edge of the inside oval just to make it 'pop' a bit.
I hope my sister-in-law and her cousin like this card as it is certainly made with much love for them from my heart.
Christina says ...
This card is really lovely Nancy and is sure to be well received. The colors you have chosen all work well together and that hint of green sets them all off perfectly.
It is a really easy card to make but the results are very satisfying and that little stand is the perfect size to display a card of this size
Click here to read or post comments
Happy Halloween 2014
by Nancy Pence
(Middletown, Ohio USA)
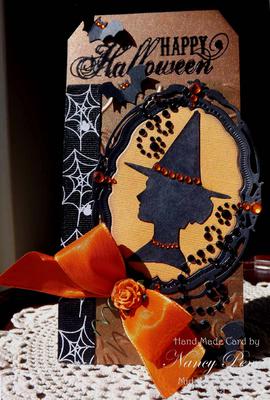
This submission is not a true card but rather a Tag that I just made for fun! The base tag is embossed and then highlighted with Tim Holtz Distress Inks.
The 'sentiment' is stamped in VersaMark and embossed in Black Embossing Powder.
The oval frame is Spellbinders S5-160 Opulent Ovals; the Witch silhouette came from the Internet, the little bats are a Martha Stewart punch.
The ribbon, gems, and flower are from my stash, but the flower probably came with a larger order from Wild Orchid Crafts
HAPPY HALLOWEEN everyone!
Christina says ...
Lovely idea to create tags as they are a perfect addition to any gifts that you may be giving.
The orange and black color scheme is so perfect for this occasion and I hope that you all enjoy the festivities when they come around.
Click here to read or post comments
Valentine's Day Pillow Box Treats
by NANCY PENCE
(MIDDLETOWN, OHIO USA)
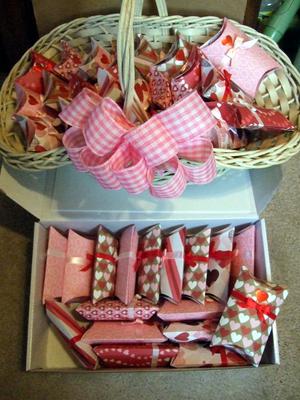
Christina, I was telling Jenny (she made the beautiful Valentine Cards posted in your Gallery) about my little pillow boxes, and told her that I would send a photo that perhaps you might post.
I made 40 of these pillow boxes for Valentine's Day and added six Hershey Kisses in each one to give out to ladies at my card club this year instead of trying to make cards.
I diligently sat with pattern and pencil and scissors in hand and drew each one, then cut them out while I watched the Super Bowl Game a couple of weeks ago.
I'll be handing them out tomorrow (Wednesday) and I think everyone will be pleased to receive a little chocolate treat!
Today I purchased the Memory Keepers Pillow Box Punch Board! I wasn't sure if I'd like making them, so I thought the pattern idea would be ok, and I set out to make 30, and ended up making 40.
It really was a fun project! So, the next time I decide to do it, I'll have punch board in hand! We all learn as we go, right?
Christina says ...
To continue learning and growing is the fun part of crafting and then sharing what it is we have just learned makes it even better
The pillow boxes are a wonderful idea and I am sure that all your friends would have been delighted with their gift.
Now I (and Jenny .. and lots more of us) want to know can we go on to your friends list too ??
Click here to read or post comments
Cardinals of Winter
by Nancy Pence
(Middletown, OHIO USA)
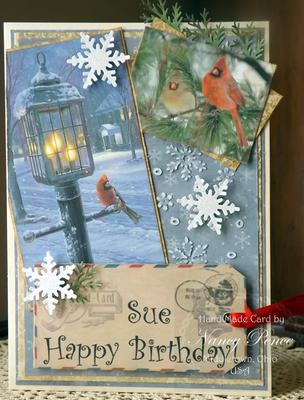
I needed to make a card for my brother's wife for her birthday next week, and didn't' have a clue what I was going to do for her.
I've been thinking about it for weeks.
She's not the "flowers, ribbons and pearls" type like we are, and that can present a challenge.
So I came home yesterday and set out to make this card, having no earthly idea what I was doing. I just asked for some intervention and guidance.
So, this is a 5x7 card, layered with a slate blue, then a cream, then another slate blue snow flake patterned paper, embossed with snowflakes, which I sanded just a little to get them to pop.
Then I found these two images of cardinals on Pinterest. She just loves the Cardinals in her yard and feeds them year round. So I thought I might be on to something with this theme.
Anyway, this is, as you say, a 'no Spellbinder' card, and it really went together rather easily.
I just framed the pictures on cream paper and antiqued the edges a little. Punched some little pine branches snow flakes, added a red ribbon to my tag, and presto!
I did print and personalize the tag on my computer, then just cut it out and punched a hole for the ribbon. I attached it with pop dots.
Christina says ...
This is a really pretty card and I agree with you that if it is not a flowers, ribbons and pearls kind of card it can set a real challenge.
But you have risen to the occasion with a beautiful card and I am sure that your sister-in-law will be delighted and so appreciative of the trouble you have gone too to find a card that suits her interests
A real labour of love Nancy and you should be really proud of your self
Click here to read or post comments
Elizabeth Border Cards
by Nancy Pence
(Middletown, Ohio USA)
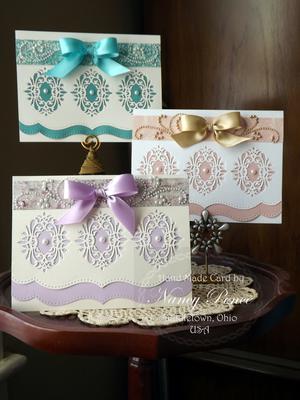
These 3 cards are 6 x 4.5", top hinge style, featuring one of Spellbinders new border dies, Elizabeth.
I saw the premise for this card on, I believe, Pinterest, and just fell in love with the overall design.
I have some friends with birthdays coming up in the early Spring and will keep these cards on hand to give them. (I'm lucky that they don't know each other, so they won't be comparing cards!)
Besides, I'm working on my dining room table at the moment, because it's just too cold to work up in my craft room until the weather warms up here in Ohio.
So, while I've got everything out to make a card, I figure why not make several of that style and keep them on hand?
In addition to the Elizabeth Border die, these cards incorporate, the A2 Bracket Borders One die, bling from Want to Scrap, single pearls, papers, and ribbon from my stash.
Christina says ...
This border die is from the Victorian Collection from Spellbinders and is the collection I featured on Create and Craft TV a while back.
It is one of my favorite collections and there are endless possibilities with any of the dies and the cards shown here are just so pretty.
It is a really good idea to batch make some cards and keep them on hand for coming events or simply to have in case you are asked for that last minute make
Click here to read or post comments
Let Them Eat Cake!
by NANCY PENCE
(MIDDLETOWN, OHIO USA)
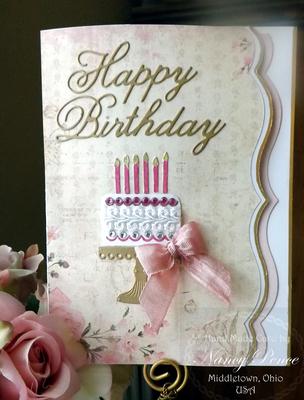
This 6" x 4.5" side hinged card is made for a friend's birthday coming up in a couple of days.
I've used Spellbinders Die D-Lites S2-081 Birthday Cake; and Bracket Borders One edged with a gold pen; Poppy Vintage Happy Birthday Style No. 1178 (I LOVE THIS DIE)
Papers by Authentique Cherish Collection; and seam binding from The Stamp Simply Ribbon Store for the bow.
The bling on the cake is from my stash, including the small piece of braided trim that looks likes yummy, fluffy frosting!
The sentiment appears to be off center to the left, but that's because I decided to off-set the page after I placed the wording. (OOPS)
The solid pink layer you see is actually the lining on the inside of the card with the inside sentiment.
The paper pad from Authentique has such pretty soft pastel prints and is just perfect for Spring time . . . which I'm hoping is going to be here SOON!
Christina says ...
Spring is on the way here in the UK and I too love the pastel shades that make you think of warmer weather and summer clothes.
This card is so pretty and the die does a really neat job of creating the birthday cake
I love the icing effect around the cake that you have done with the braid. Makes it look good enough to eat.
Click here to read or post comments
Victorian Medallion Three
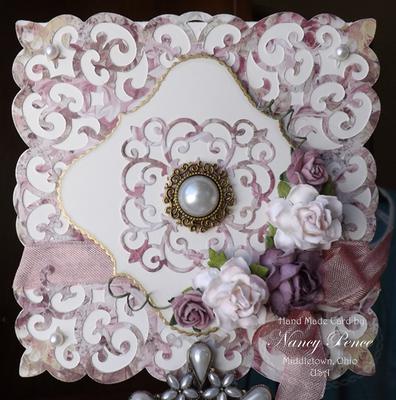
by Nancy Pence
(Middletown, Ohio USA)
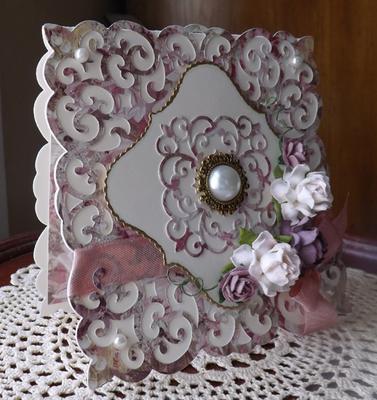
This Birthday Card is 5" x 5", and I've made for a friend whose special day is coming up in April.
I've used Spellbinders new Victorian Medallion Three die as the overall design for this top-hinged card. I lined the inside with matching paper as the outside.
I cut Scalloped Labels One (I believe the second die in the set) for the centerpiece, and edged it with gold Krylon pen, then cut the center piece of the Medallion to adhere to the Scalloped Label.
The addition of flowers from Wild Orchid Crafts, some seam binding ribbon, and a decorative pearl button in the center finishes off this card nicely.
Christina says ...
Such a pretty feminine card and one I am sure that your friend is going to love and it will take pride of place on her mantle shelf
I love the color that has been used and the Victorian Collection is one of my all time favorites.
There are so many lovely and versatile dies to use in that collection that it would be hard to choose just one
And of course my other passion is the flowers and what could be better than Wild Orchid Crafts.
The choice of colors, styles and sizes is amazing and the quality is second to none ... they are my go to place every time
Click here to read or post comments
Sunny Summer Days
by NANCY PENCE
(MIDDLETOWN, OHIO USA)
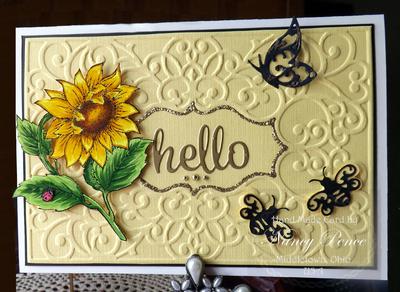
Hi all! I just finished making 6 of these cards to send to "Card Buddies" that I have on another site, and thought that I'd share it with you, too.
This 4 1/2 x 6 1/2 card was so much fun to make, but just took some time, with all of the detail work.
The Embossing Folder comes in a Tim Holtz set of two called Scrolls & Lace; the Sunflower and lady bug are in a JustRite Cling Stamp set called Sunflowers, Vintage Labels Five; the butterfly is from Spellbinders Heart & Flutter die set; and finally, the sweet little bumble bees are on a Cricut Cartridge called Sentimentals.
I outlined the 'frame' at the center of the embossed layer in gold Stickles to set off the 'hello', which is a die by Waltzingmouse Stamps that I just love.
There are a lot of techniques incorporated into this card.
I used Copic Alcohol Markers to color in the Sunflower, and a red glitter pen for the lady bug, which were then fussy-cut so they could be added to the card base along with the other elements.
Three little gems under the 'hello' and the card was finished.
I kept trying to find a place for even a tiny bow, but the card just doesn't need anything else.
The cards were just posted yesterday (Jul 7th) so I haven't received any reactions yet, but I think the recipients will be pleased.
Christina says ...
This is such a lovely idea and I love the p[ale yellow you have chosen. All the elements work so well together and I am sure that all your friends will have been delighted with their own card
Click here to read or post comments
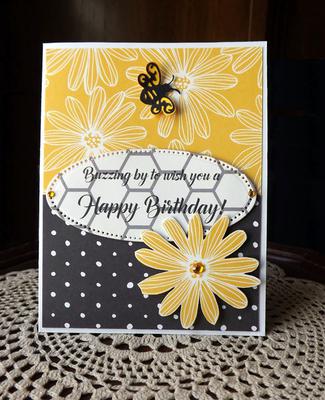
Just Buzzing By . . .
by NANCY PENCE
(MIDDLETOWN, OHIO USA)
Christina, Here is another summer-themed card, that I just fell in love with! I think it's that cute little bumble bee!
I found the pack of 12 x 12 yellow paper at a discount store here in the States for $2.99 for 25 sheets! What a deal! And, it's double sided.
The honeycomb print in the center of the card is the reverse side of the yellow flowers. SO CUTE!
Anyway, this card is 5 1/2 x 4 1/4" and I was making it for a Clean and Simple card (which it is, for me) until I found out that CAS cards have to be mostly white! Darn! Hey. That's ok. I'll give it to someone!
The sentiment is cut with die # 2 of Spellbinders Radiant Rectangles (just a single edge oval cut), and the little bee is on a Cricut Cartridge called Sentimentals.
I did the sentiment directly onto the honeycomb paper with my computer, and the flower is one cut from the yellow paper. I love this little card! I hope every one is having a great summer!
Christina says ...
Such a sunny cheerful card would be enough to brighten any ones day and I love how you have put it all together using both sides of your paper.
The Honeycomb pattern is really effective and what a bargain price for you to pay. I love to visit the craft shops and craft shows and have a real good browse around.
I always end up coming home with something after having a good day out in the process
Click here to read or post comments
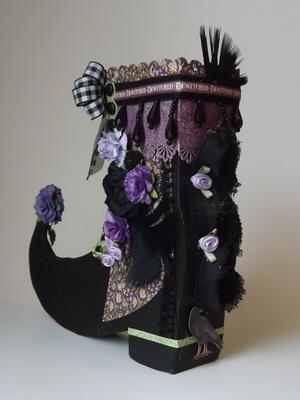
Halloween Witches Boot
by Nancy Pence
(Middletown, Ohio USA)
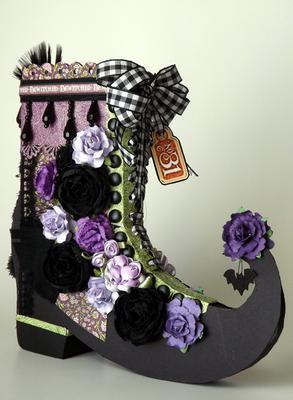
Christina, hi! This is not a card, but made of paper, just the same.
And if it doesn't qualify for posting on your site, I understand. Maggi Harding, a designer at Graphic 45 made the one that I saw on-line, and I just had to give it a go.
The project is a little tedious, especially without the advantage of a cutting file (I believe she used one).
I just went to Pinterest and got a template, so I had the front and back, then I had to retrofit the top, back spine, and sole of the boot together.
I am so tickled with how this came out, and thought I'd share it with you.
The boot measures 7" tall, 7" from toe to heel, and is 2" across at the back of the heel, which tapers to a point at the toe. Some of the paper I used is from G45 Rare Oddities Collection, most of the flowers are from Wild Orchid Crafts.
The ribbon, brads and feathers came from the local Michaels Craft Store.
Christina says ...
Wow !! what a fabulous projects this is Nancy and I love the color you have used.
It looks so intricate but despite all the fiddling the finished effects is simply gorgeous.
It should take pride of place for whoever receives it. Well done to you xx
Click here to read or post comments

Recent Articles
-
Memory Book
Oct 15, 22 09:17 AM
Make a memory book, fun to make and even lovelier to give. -
Die cut letters.
Jul 19, 21 10:12 AM
Add that personal touch with die cut letters, add names or sentiment as you please. -
Diaper Fold Card.
Jul 19, 21 09:34 AM
Create this fun Diaper Fold Card...and no need for a pin!
Search

